
Mila, the world’s sweetest Golden Retriever mix, greets us at the entrance to the Friis-Lodahl’s home in Lido. Rescued from the hutongs by dad and tech entrepreneur Jesper Lodahl, she’s now a healthy and happy family pet. Today, mom Charlotte is taking a break from entertaining guests from the family’s home country of Denmark to demonstrate her teddy bear cake for beijingkids. The Friis-Lodahl’s daughters, Laura (age 7) and Asta (5), are at school (Fangcaodi and Twinkle Twinkle respectively), so the only sounds in the house are the swish of Mila’s tail and the occasional hum of their stylish air filter prototypes disguised as stereo speakers.
Friis-Lodahl stepped away from a decade-long career in product marketing for Nokia to live family life to the fullest. One of her first acts of full-time domesticity was to start making birthday cakes for her daughters using natural, wholesome ingredients and a homespun touch. “You don’t need to buy a lot of expensive equipment,” she says. “My cakes are never perfect because a homemade cake is supposed to look homemade.” Although today’s project looks difficult, she reassures us that, although time-consuming, “you can get away with first-timers’ mistakes because everything is hidden under the teddy bear’s fur.”
Sponge Cake
Ingredients:
- 320ml milk
- 5 egg whites and 2 whole eggs
- 3tsp vanilla extract
- ½tsp almond extract
- 465g flour
- 350-450g sugar
- 1tsp salt
- 1½tbsp, and 1½tsp baking powder
- 345g butter, softened
Instructions:
1. Fit a baking sheet to a 10.5 inch x 14.5 inch baking pan and grease it well with butter.
2. In a bowl, mix the egg whites and the sugar. Add the butter and mix well.
3. In another bowl, mix the flour, salt, and baking powder.
4. Add some of the dry ingredients together and stir. Pour in some milk and continue stirring. Keep gradually adding dry ingredients and milk until the two mixtures are thoroughly combined.
5. Add the whole eggs and the extracts to the cake batter.
6. Pour the cake batter into the pan and bake for approximately 40 minutes on 200°C. Let cool completely before cutting.
Tips:
- Put the cake in the freezer for 20-30 minutes before you cut it to firm it up and prevent it from crumbling.
- All ovens are different, so check if it’s done by inserting a toothpick into the cake. If there’s dough sticking, the cake isn’t ready yet. Once the stick comes out clean, the cake is done.
- Lay everything out in little bowls before you begin. Baking is a chemical process; if you get the amounts wrong or miss an ingredient, the results may be inedible.
Ganache
Ingredients:
- 300ml whipping cream
- 600g dark chocolate (65%)
Instructions:
1. Bring the whipping cream to boil, then pour it over the chocolate. Stir until completely smooth.
2. Refrigerate until ready to use.
Tips:
- If the ganache is too stiff, microwave it for 10-20 seconds.
- Ganache can be stored for two to three weeks in an airtight container.
Fondant
Ingredients:
- 250g marshmallows
- Approximately 1.5kg icing sugar
- 12tbsp water
- 6tbsp flavorless oil
Instructions:
1. Put the marshmallows, oil, and water in a bowl. Microwave until the marshmallows have melted, one minute at a time while stirring. Don’t let the mixture brown.
2. Add the icing sugar a little at the time. Knead until the consistency is firm but slightly sticky. Refrigerate for six hours before using.
3. Take out the icing sugar approximately 30 minutes before using so that it softens. Dust your work surface with icing sugar and knead the fondant before rolling it out.
Tips:
- If the fondant is still hard to work with, put a bit of vegetable shortening on your hands while kneading.
- If desired, add colors while the mixture is still liquid; adding it later takes much more time and effort to get the color even.
- Use gel or paste colors; they’re easier to work with. These can be purchased from City Shop or Taobao. Friis-Lodahl usually uses the Wilton brand.
Buttercream
Ingredients:
- 500g butter
- 1kg icing sugar
- 1tsp extract (vanilla or almond)
- A little bit of milk
- 1-2 drops of food coloring
Instructions:
1. Beat the butter in a mixer until it becomes soft, white, and fluffy.
2. Add the icing sugar a little at a time. Add the extract and beat the mixture on the highest speed for 1 minute.
3. If the buttercream isn’t fluffy, add a little milk and beat it again. Add food coloring and mix until color is uniform.
Teddy Bear Birthday Cake
Serves 25

Assembly Instructions:
1. Cut out the templates and arrange them on the cake. If the shapes are laid out correctly, there will be enough space for for a third head section if necessary. (Download the teddy bear template here.)

2. Cut out the shapes.

3. Stack the shapes together and check if they look right. If for some reason the sponge hasn’t risen and the head is too small, add an extra layer of cake to the head.

4. Cut off one of the legs from the bum and move it to the side to create more space between the legs. Next, carve the edges of the stomach and shape the head with the knife as shown in the pictures.
5. Once you’re happy with the shape, cut a piece of strong cardboard in the shape of the teddy’s bum. This will support the bottom of the cake when you move it to a presentation plate.
6. Add ganache to your work surface; affix the bum-shaped cardboard. Next, ganache-glue the bum to the cardboard. You will now have a sturdy base to work with.

7. Smear the end of the leg you cut off with ganache and glue it back onto the bum 2-3cm apart. If you want the feet to tilt outwards, trim one corner at the bottom and the feet. Now glue them to the legs with ganache.

8. Add the body and ganache it to the bum, and follow with each layer of the head. Cover the whole body and head with a thick layer of ganache so it becomes one firm piece. Refrigerate for ten minutes. Dip a brush in boiling hot water and run it over the surface of the ganache to smooth out any lumps, bumps, or sharp edges. Since the whole bear will be covered with fondant and buttercream, it doesn’t have to be perfectly smooth.

9. Roll out your fondant in a circle with an even 4mm thickness. Drape the fondant over a rolling pin and place the center of the fondant circle over the teddy’s head. Begin molding the fondant over the head and body. Make sure you keep the shape of your teddy as you smooth and trim the fondant.

Fondant Body Parts Instructions:
1. To make the ears, roll a disk of fondant to cut it in two pieces. Pinch and curve the ends to create the ear shape. Brush the fondant on the head with water and attach the ears. The moistened fondant glues the ears in place.
2. Make a ball of fondant and stick the tail on the back of the teddy.

3. To form the muzzle, roll a short sausage and cut it in half. Flatten it slightly and glue it to the teddy’s face with some water.

4. Roll a longer sausage and cut it in two. Take each half and roll again, patting one end to make it thicker, gradually forming a carrot shape as you go. Glue the arms to the teddy’s body with some water.
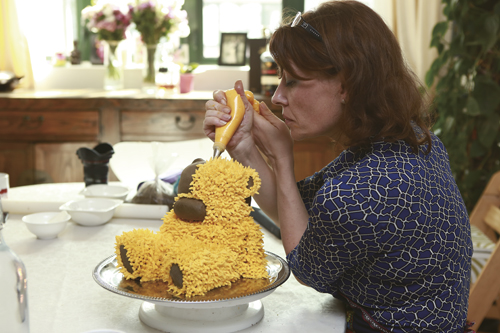
Fluffy Teddy Fur Instructions:
1. Put a small amount of buttercream in a piping bag and use a star number 6 nozzle (or any small-sized star nozzle).
2. Squeeze out a blob of buttercream, and pull back quickly to create small peaks. Start between the legs, as this is the trickiest part to access. Finish the front of the teddy first. If you need to make more buttercream, any color differences will be hidden at the back.
Tip: Don’t pipe your fur in neat rows; approach it from different angles to give it an irregular, fluffy realism.

Fondant Bear Feature Instructions:
1. For the nose, roll a piece of black fondant into a ball, flatten one side, and shape it gently into a triangle. Glue it to the muzzle.
2. Roll out some brown fondant and cut out two circles. Repeat with the black fondant and make your circles smaller. Wet the fondant and stick the disks together. Glue them onto the buttercream.
This article originally appeared on p28-31 in the November 2014 issue of beijingkids. To view it online for free, click here. To find out how you can obtain your own copy, email distribution@truerun.com.
Photos: Ken


